Knowing how to check car oil is a basic yet crucial skill for any vehicle owner. Checking the oil level ensures the engine stays properly lubricated, preventing damage and keeping the car running smoothly. This simple task can save time, money, and help avoid serious mechanical problems.
Many people wait too long to check their oil or don’t check it at all. Understanding when and how to check the oil helps keep the engine clean and efficient. A quick check with a dipstick can give important information about oil level and quality, guiding when an oil change or top-up is needed.
This guide will explain all the necessary steps to check car oil accurately and avoid common mistakes. With a few basic tools and clear instructions, anyone can maintain their car’s engine health and improve its performance.
Key Takeways
- Regular oil checks prevent engine damage and costly repairs.
- Knowing how to read oil levels and quality helps spot issues early.
- Simple, correct checking steps keep the engine running efficiently.
Why Checking Car Oil Is Important

Checking car oil helps keep the engine running smoothly, saves money on repairs, and can improve fuel use. Regular checks ensure oil levels are right and the oil is clean. This protects the engine and keeps the car reliable.
Engine Performance and Longevity
Oil lubricates all moving parts inside the engine. Without enough oil, parts rub together, causing heat and wear. This can lead to engine parts breaking down faster.
Regular oil checks help prevent damage from low or dirty oil. When oil is clean and at the right level, it cools the engine and stops metal parts from grinding. This keeps the engine working well for a longer time.
Preventing Costly Repairs
Failing to check oil can lead to serious engine damage. Low oil levels or old, thick oil can cause parts to overheat or seize up. When this happens, repairs become expensive.
By checking oil frequently, owners can spot problems early. They can change oil before it loses its protective quality. This simple step helps avoid costly engine fixes such as replacing gaskets, seals, or even the entire engine.
Fuel Efficiency
Clean oil reduces engine friction, which means the engine doesn’t have to work as hard. This helps the car use less fuel. When oil is old or low, engine parts don’t move as smoothly.
Checking oil regularly can lead to better gas mileage. Consistent oil care helps maintain the engine’s efficiency, saving money on fuel over time. This also reduces wear that could lower performance and increase fuel use.
When to Check Your Car’s Oil
Knowing when to check the oil in a car helps keep the engine in good running condition. Regular checks prevent damage, save money on repairs, and improve fuel efficiency. It is important to be aware of how often to check, signs that oil may be low, and special cases like after long trips.
Recommended Frequency
Checking the oil every month is a good rule for most drivers. Some recommend doing it more often if the car is older or drives frequently in tough conditions like very hot weather or heavy traffic. Checking oil about every 1,000 miles or 1,500 kilometers is common advice.
If the car uses synthetic oil, the oil change interval might be longer, but the level should still be checked regularly. Always make sure to check with the car’s manual for specific advice about the make and model.
Checking oil once a week is best if the driver notices any leaks or the car burns oil faster than usual. Consistent checks help catch problems early, avoiding bigger engine issues. More details on oil maintenance can be found at Car Care Council.
Warning Signs of Low Oil
Low oil can cause the engine to overheat and parts to wear down quickly. Drivers should watch for dashboard warning lights like the oil pressure or check engine light, which are clear signals to check the oil level right away.
Other signs include unusual engine noises such as knocking or ticking sounds, smoke from the exhaust, and poor engine performance. If a car smells burnt or the engine runs rough, low oil could be a cause.
Ignoring these signs can lead to serious damage. Checking oil at the first sign of trouble can prevent costly repairs. For accurate reading, check the oil when the engine is cool or has been off for at least 10 minutes.
Oil Check After Long Trips
After long trips, checking the oil is very important because the engine runs harder and uses more oil over long distances. Long drives can cause oil to break down or get dirty faster.
Drivers should stop when parked, let the engine cool for a few minutes, then check the dipstick for the oil level. If the level is low or the oil looks dark and dirty, an oil change is needed soon.
Long trips with heavy loads or steep climbs put extra stress on the engine oil. Frequent checks before and after such trips help maintain the car’s performance and prevent breakdowns. For step-by-step oil checking, see the guide at AutoZone.
Tools and Supplies Needed
Checking car oil requires a few basic items that make the job easier and cleaner. The main tools needed include a clean cloth or paper towel to wipe the dipstick and gloves to keep hands clean. Both help ensure accurate reading and prevent grease stains.
Choosing the Right Cloth or Paper Towel
Using the right cloth or paper towel is important for a clear oil check. A lint-free, soft cloth works best because it won’t leave fibers on the dipstick. Paper towels are convenient since they are disposable, but they should be strong enough not to tear easily when wiping oil.
Avoid rough or dirty rags since they can contaminate the dipstick and affect the reading. Some car owners prefer microfiber towels for better absorbency without leaving residue. The goal is to get a clean surface that shows the oil level clearly.
For more details about proper materials, resources like AutoZone provide helpful guides on essential tools for oil checks.
Using Gloves for Cleanliness
Gloves protect hands from getting oily and dirty during the process. Nitrile gloves are a good choice because they resist oil and chemicals. Using gloves also reduces skin contact with engine dirt and oil, which can irritate skin or cause stains.
While gloves are not absolutely required, they help maintain a cleaner workspace and make the task more comfortable. Disposable gloves are recommended since they can be thrown away after use. This avoids spreading oil onto other surfaces or tools.
Wearing gloves also shows good practice for anyone maintaining their vehicle regularly. For more expert tips on equipment for checking oil, websites like Firestone offer practical advice on keeping your hands clean.
Step-by-Step Guide: How to Check Car Oil
Checking car oil involves a few clear steps to ensure the engine is properly lubricated. The process includes making the vehicle ready, finding and using the dipstick, and reading the oil level correctly.
Preparing Your Vehicle
Before checking oil, the car should be parked on a flat surface to get an accurate reading. The engine needs to be turned off and should have been off for at least 5 to 10 minutes. This pause allows the oil to settle back into the oil pan.
The hood should be opened safely, using the hood release inside the car and the latch at the front. It is important to check the owner’s manual if unsure. Avoid checking oil immediately after driving, as hot oil can give a misleading reading and cause burns.
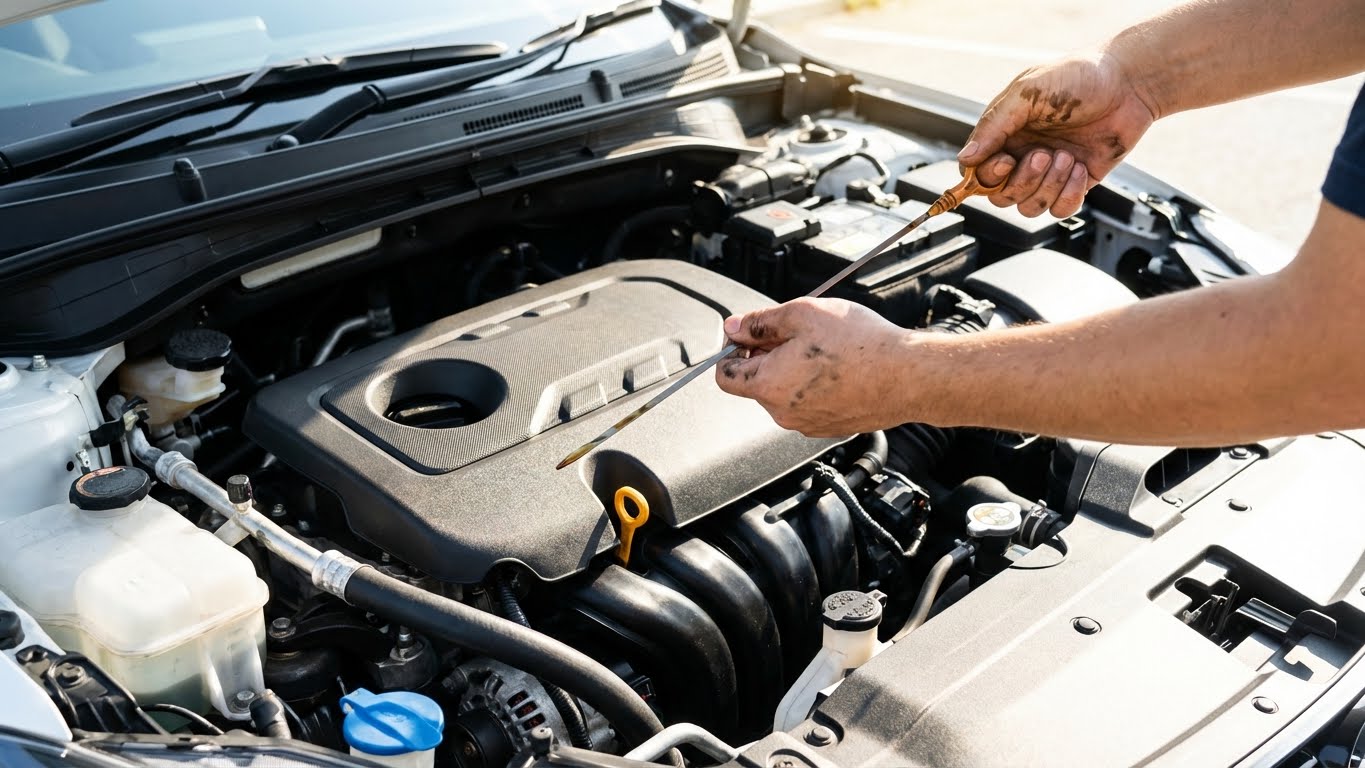
Locating the Dipstick
The dipstick is usually easy to find and often has a brightly colored handle—yellow or orange. It is located near the engine, but the exact spot varies by vehicle make and model.
If the dipstick isn’t obvious, the user manual will show its location. Some modern cars may have electronic oil level monitors but most still use a dipstick. Identifying the right stick is crucial to avoid checking wrong fluids.
Properly Removing and Cleaning the Dipstick
To check oil, the dipstick must be pulled out carefully. After removal, wipe it clean with a cloth or paper towel. Cleaning it removes old oil and helps get an accurate reading.
Once clean, reinsert the dipstick fully back into the tube. It needs to be pushed in all the way, then pulled out again to check the oil level. This process ensures fresh oil covers the marked area of the stick.
Interpreting the Oil Level
The dipstick will have two marks or a crosshatched area showing the minimum and maximum oil levels. The oil should be between these marks.
If the oil is below the minimum mark, it means more oil is needed. If it’s above the maximum, there might be too much oil, which can damage the engine. The color and texture of the oil are also important. Clean oil is usually amber or light brown and smooth, while dirty oil is dark or gritty, signaling it needs to be changed.
Interpreting the Oil Level (Continued)
If the oil level falls between the minimum and maximum marks, the level is normal. If it is close to the minimum, plan a top-up soon. Clean oil should be amber or light brown, while dark or gritty oil signals it may be time for a change. If the oil smells burnt, that is also a warning sign.
Monitoring both the level and condition helps prevent engine wear and ensures smooth performance. When in doubt, consult the car’s manual or a professional mechanic for guidance.
What to Do If Your Oil Is Low
If the oil level is below the minimum mark, adding the correct type of oil is necessary. Follow these simple steps:
- Identify the correct oil type
Check the owner’s manual for the recommended oil grade (e.g., 5W-30, 10W-40). - Locate the oil filler cap
It’s usually labeled “Engine Oil” and found on top of the engine. - Add oil slowly
Pour a small amount at a time to avoid overfilling. Use a funnel to prevent spills. - Recheck the dipstick
After adding oil, wait a minute, then check again. Repeat until it reaches the proper level.
Avoid adding too much oil, as overfilling can cause foam formation and reduce lubrication efficiency.
How to Tell If Your Oil Needs Changing
Even if the oil level is normal, its condition may require attention. Look for these signs:
- Dark, dirty, or sludgy oil
- Grit or metal particles on the dipstick
- Burnt smell coming from the oil
- Thicker texture than usual
- Dashboard oil change reminder light
If any of these signs appear, schedule an oil change soon. Clean oil improves engine efficiency and supports long-term performance.
For more information on when to change oil, see guides from the Car Care Council and AutoZone.
Common Mistakes to Avoid When Checking Oil
Checking Oil Right After Driving
Hot oil doesn’t settle properly, giving inaccurate readings. Always wait 5–10 minutes after turning off the engine.
Using a Dirty Cloth
Dirty rags can contaminate the dipstick and affect the reading. Use clean, lint-free cloths or strong paper towels.
Ignoring Warning Lights
The oil pressure light is a serious warning. Do not ignore it, even if the oil level looks normal. Low oil pressure can quickly damage the engine.
Overfilling the Oil
Too much oil creates pressure and can damage seals or cause leaks. Add oil slowly and check frequently.
Conclusion
Checking your car’s oil is a simple habit that protects the engine, saves money, and improves performance. With just a dipstick and a few minutes, you can ensure your engine stays properly lubricated and healthy. Regular checks help catch issues early, making your car more reliable on the road.
By following the steps in this guide and maintaining consistent oil care, any vehicle owner can extend engine life and avoid costly repairs. A little attention goes a long way toward keeping your car running smoothly.